Thursday, April 29, 2010

Spring Top Week Adventure

So have you heard about spring top week over at Made by Rae? I've been following Rae for well over a year now, and was really inspired by last years spring top week, so when I heard she was doing it again I thought this was the perfect opportunity to raid my stash and make something lovely!


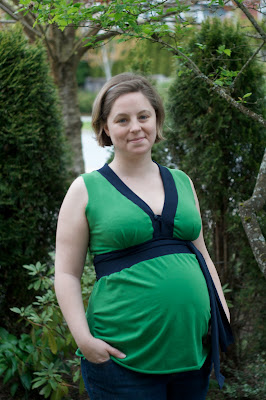
My Top!!
This took lots more work than I thought it would, but I'm so excited to be finished!

Fabric:
Green cotton stretch fabric purchased to make maternity tops the last time I was pregnant (2.5 years ago).
Navy cotton stretch fabric thrifted from a pair of pajama pants


Pattern: Simplicity New Look 6615

This is a dress pattern, cut down to a tunic top - Since this pattern was intended for woven fabric it ended up posing some challenges with respect to sizing.

Changes:
- Cut the lower front panel much larger to accommodate the belly!
- Adjusted to back panel to be cut on the fold (to reduce sewing)
- Added pleats to the top back to make up for the extra fabric that was added by cutting on the fold.
- Traded in the shaped bands for straight cut bands, I figured that since I was using a knit the bands didn't really need to be curved. Also, it was much easier to cut straight bands from the thrifted pants.
- Added extra long side ties that would wrap around to tie in the front (I hate having a knot in my back!)
- Added a small loop and button to the front to keep it modest but still allow for use as a nursing top.


Challenges
This took way more time than I anticipated - 4 naps and 3 evening! The cutting alone took 1.5 naps (3.5 hours!)
- I usually pin baste to test then just go ahead a sew! It's not a great way to work, but it tends to work well for most projects. The problem here was that I used my very short lightning stretch stitch to put it all together then realized that I was going to have to make some changes and needed to spent almost 2 hours stitch ripping the bust and neck lines.

- The original bust pleats that looked great pin basted, looked horrible once sewn, not only were they just bad, they were also in the wrong spot!

- The lower front and the back turned out pretty well, but the front/top/bust area was quite large and needed to be taken in over and inch in both the shoulders and the sides. I should have anticipated this since I cut for my size using a woven fabric pattern!!

- Needless to say I basted the second time around to make sure that everything would fit!

- Maternity/Nursing top - I intentionally made the front long and added several pleats to the side to accommodate my belly, but I also used a slightly looser stitch in that area that will be a little easier to remove and adjust into a non-maternity top in 2 months when baby is here.

- Sleeves: I originally cut the sleeves, but hubby liked it better without, and once I'd tried a couple of times to pin them in I realized that the adjustments due to using a knit fabric were going to make the sleeves a little more difficult to put in. I'll set the sleeves aside, and if I'm still loving this top by the time fall rolls around I'll put them in then.


Conclusion

Whew! That was hard work. I don't think I'll use a woven pattern to make a stretch knit again in the near future!!

I'm really pleased with the overall look! I love the way it fits and I am especially happy with how the front turned out - reasonably modest with the button, while still allowing for nursing access - plus it doesn't look like one of those frumpy double layer nursing t's!

I'm also really glad I sucked it up and used some of the nicer fabric from my stash! These are my colours and I know I'll get tons of wear out of this top throughout the spring and summer, and probably well on into the fall.

Monday, March 29, 2010

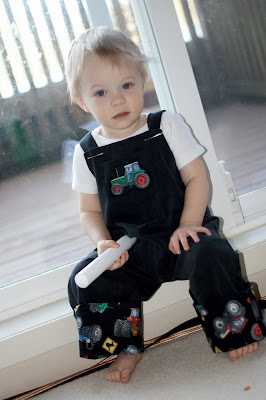
Toddler Overalls from give away pile pants!!

Ok, so this blog is great and all, but only if I post stuff!! I actually made these pants and wrote the post back in January, then left them sitting in the sewing room because they were too big for the Bug (my 2year old son)! I figure before I can move on to another project I need to get this one finished up and posted.

Here we go. . .

I'm new to this blogging thing, so although this isn't a tutorial, I am going to explain the making of these pants in laborious detail, mostly for my own reference when I try to do this pattern again later!

I started with pair of black pants stolen from my mom's give away pile.

These are a little bigger than any of the other pants I had in the sewing pile so I chose to make overalls rather than pants because I thought I would have enough for the upper part of the overalls as well as the facings.

I started by lining the pattern pieces up and seeing if they will fit. Looks like they will so I cut up the inseam so that the pants will lay flat and I can cut the different front and back pieces for the overalls.

Since I want to kept the existing side seam to reduce the amount of sewing, I line up the front and back pattern pieces with their sewing (not cutting) lines along the existing side seam overlapping their seam allowances. Mark the front and back pieces on one side of the pants.

Flip the pants over. Flip the pattern pieces over. Mark the other side!!

CUT!!

Yeah, I now have the main overall pieces cut.


With the remaining bits of pant I mark and cut the facings and straps.

Sew the front and back seams then sew the crotch seam - The pattern calls for snaps here, but I am not making these snappy pants as I usually end up pulling overalls down off the Bug anyway.

Sew on the straps and facings, then press everything!

Search though the stash for coordinating fabric for pocket and cuff facing. I ended up choosing some tractor fabric. I thought that since these looked like farmer pants the tractors would be appropriate. I also cut out one tractor and appliqued it to the pocket. Finally I finished the pocket, and cuffs.

Total project time:

30 min(cutting and checking)
1h min(sewing, checking, sewing . . .)
15 min(rummaging through stash to find pocket material)
1h min(finishing up!)

Wow - free overalls for the bug in under 3 hours. These are faded and a little too big for him right now, but that just means they will be play pants for the summer! I love dressing the Bug in things that I don't have to worry about getting messy!

Next up on the project list - Spring Top

2010 the year to Sew Fearlessly!

What am I here for?

When our family prepared to move out of our 650sqft condo last year we moved tons of our stuff into payed storage. And by tons, I really do mean tons, we filled FOUR - 3'x4'5' storage lockers. I literally have no idea where this stuff was hiding out in our tiny condo.

Since moving I've spent a considerable amount of time in our various storage lockers hunting for things I'd really like to have in our new home.

While digging through the storage lockers recently I realized that I had 6 large plastic storage bins marked "Craft Supplies" and another 3 large trash bags filled with fabric and yarn. I noticed something very important that day:

I'm afraid to use the fabric and supplies in my stash because I think I"m going to mess something up and waste a great piece of fabric. That what I might make will suck and it will end up costing me more than if I'd just bought a retail item.

But here's what I realized while in storage - I'm wasting money every day that I'm too afraid to sew or craft something. It's costing me money to store the supplies I have, so making something poorly is just an opportunity to learn more about sewing so that I can make beautiful things in the future.

So here we go: 2010 - the year to Sew Fearlessly. I'll be starting the year with some simple projects, things like remaking old clothes into something new, baby clothes, alterations (maternity clothes?) accessories, and hopefully later in the year some garments.